Chillout - One Page WordPress Theme
Documentation
- created: 01/12/2014
- latest update: 16/02/2015
- by: Apollo13
- email: info@apollo13.eu
Thank you for purchasing our theme. In case of any questions or doubts, do not hesitate to contact us via our Support Forum: http://support.apollo13.eu/. We will do our best to solve any problem concerning the project. At the same time we invite you to visit often our profile on ThemeForest since there will be appearing the improvements of our project and the newest actualizations.
Welcome
After seeing eye-catching demo page of Chillout theme, you can now explore main features of our new WordPress theme.
We've developed and improved swift and intuitive way to design OnePage styled website with a very clever way to organize the navigation. The Chillout theme is all about simplicity and flexibility. To find out how make Chillout to display your content - please take a look at this modest documentation.
Installation & Update
Install
As a good beginning of becoming familiar with theme manipulation read this Wordpress documenation section.
To install theme you can:
-
Upload it via FTP(safer)
- Download ZIP file from ThemeForest and find in it chillout.zip (theme file)
- Unpack files from chillout.zip. You should now have directory chillout and in it other directories and files like 404.php, home.php, index.php etc.
- upload whole chillout folder to /wp-content/themes/ in your WordPress installation
- login to admin panel in WordPress, and go to Appearance->Themes and click Activate below Chillout theme
-
Upload it via admin panel(can get error while upload on slower connections)
- Download ZIP file from ThemeForest and find in it chillout.zip(theme file)
- go to Appearance->Themes->Install Themes(Tab)->Upload and choose file chillout.zip
- go to Appearance->Themes and click "Activate" below Chillout theme
After that you will see new menu named Chillout options and that is where all fun begins :-) Also you will see My Works and People menus. We will write about it later.
After installation
It is good practice to set permalinks for your blog. Go to Settings->Permalinks and set anything other then default seetings.
Add menu
Next you should choose menu to use in theme. It is very simple. Go to Appearance->Menus, create some menu(even with one position) and select available menu in Theme locations-> Site Navigation. Read more about creating WordPress menu.
To be able to get 100% from Chillout you must make Navigation Anchors visibile in menu section (we'll cover this topic HERE).

One more thing is to be set in this area. On demo page You can see a modest animation apllied to items of navigation menu. Each item has its own icon that appears on mouse hover.
All You need to do is to enter icon class taken from FontAwesome collection, which can be found here: FontAwesome

Installing required plugins
Chillout needs a set of plugin to show its beauty. All commercial plugins are included and ready to install. All you need to do is to go to Appearance > Install Plugins and install all plugins marked as required. Don't forget to activate them.
Next you should scan through Chillout options to set everything you need. We will go through all the options and we'll make some explanations HERE
Update theme
As this theme is commercial one, for now we don't provide auto update option for theme, as this will lead to easily stealing our work. In future this may change, but for now updates are only available on ThemeForest in place where you have downloaded your first version of theme:-) Although WordPress will inform you about new version of theme, but you still will have to go to ThemeForest site.
When you got zip file with theme, best way to update theme is to use plugin such as http://wordpress.org/extend/plugins/easy-theme-and-plugin-upgrades/. If you have problems with updating theme from Wordpress admin panel, you can also manually delete theme via FTP and upload new version. You wont loose your theme settings.
If you have made some changes in theme files you will have to manually update to keep your changes.
Remember to always backup your data before update!(or cry if you didn't and something went totally wrong)
Use of Easy Theme and Plugin Upgrades
Upgrading a Theme(copied form plugin page)
- Download the latest zip file for your theme.
- Log into your WordPress site.
- Go to Appearance > Themes.
- Click the "Install Themes" tab.
- Click the Upload link below the main page tabs.
- Select the zip file with the new theme version to install.
- Select "Yes" from the "Upgrade existing theme?" option.
- Click "Install Now".
Installing Demo data
Demo data
If you really need to see your new site as our demo page, then this is section for you. This is why we provide sample data, if you like to see how it is all made from backend in admin page. If you are confused about options in theme, we advise to use it only to see how things are made. After that, you should clean your WordPress so you don't have any unwanted content ;-)
Warning!!! if you WILL NOT delete permanently all pages and posts before importing demo data you will face problems with navigation menu.
How to install sample data:
- Locate the chillout.wordpress.xml file in Dummy Data folder in file downloaded form ThemeForest
- Open Tools->Import menu and choose WordPress option(Installation may be needed first).
- Upload sample_data.xml file.
- On next page you should check Download and import file attachments
But it would be simple if this will end here :-) Import will probably fail(cause of timeout while downloading images), so you will have to repeat above steps few times, till you get success message. After this fallow next steps:
- Go to Settings->Reading->Front page displays and assign pages for front page and blog page
- Go to Appearance->Menus->Theme locations-> Site Navigation select available menu(adding menu).
- You may need to clean menu listed on the right couse it may have 'doubles' due to many import atempts.
- Widgets will be totaly no good, so go to Appearance->Widgets and make some cleaning and inserting.
- Last thing we have to create user.css file from default settings. To do that, we have to edit any setting of theme. Go to Chillout options->Layout->Layout main settings->Custom background color and set to any color. But for real, you can change any option of theme to recreate user.css file.
- Theme should look good enough now.
Chillout Options
Most of the options you can set here need no explanations, so this section of documentation will not be verbose.
Layout
- General - favicon and background
- Logo - logo image for normal screen and for retina-like devices + logo positioning
- Preloader - configuration of page preloader, which can be disabled, but it improves browsing experience
- Header - how it looks and how it contains navigation menu
- Buttons and links - color and sizes of buttons and anchors
- Headings - font sizes for all headings H1 - H6
- Navigation Menu - colors, positioning and some text properties for menu and submenu. All setting for submenu have effect on navigation menu in mobile mode.
- Footer - you can design default footer here if you enable classic footer switch. But you can always design your own footer and place it directly within the page design (we'll cover this subject later)
- Typography - typography setting for three font groups
Works (portfolio)
Here you can configure global setting for all media of Works in single view. About adding and managing media within Works - read more HERE.
Blog
Here you can find all the settings concerning a page you choose as a blog page and single post view. There you can also define Page Lead look for blog page, search result page and single post view, and - finaly - global settings for 'Latest Posts' shortcode.
Social settings
First block is about Contact Form 7 plugin and its way to display errors and messages. Second block let you choose social services you want to display in footer or in page desing by special shortcode.
404 page
If you want to have special page for 404 error - just desing it as normal page and point this page here.
Custom css
Place where you can totally change the look of our theme with your own css classes.
Adding Content
Designing the content of One Page Chillout theme is done by shortcodes only. We have picked WPBakery Visual Composer plugin, well known for its flexibility. Things that you need to do separately are Posts, People, Works, Contact Forms and Slider. First three of them are just different types of posts, rest of them are managed by separate plugins, which are well documented - therefore we will not talk about details concerning those plugins.
First we'll talk about thing we have added to posts (pages has no additions options or metaboxes), then we'll talk about Works by pointing out things typical for those custom post types, and at the very end we'll describe the way to desing OnePage layout.
Posts
If you are not familiar with adding posts in WordPress please read http://codex.wordpress.org/Writing_Posts
Adding posts is same as always in WordPress, but with few tweaks. You use Featured image or Video/Audio to represent post.
For image and video you can also select how it should be stretched or aligned and how big it should appear(medium, big or original).
Also you can choose to use full width content by turning off Sidebar.
The last four settings are applied to layout of each post displayed within 'Latest Posts' shortcode.

Works
Adding new work is pretty easy. First you should set title and Featured image - this is necessary for displaing properly this Work on Works block with speciall shortcode.

Next you can fill description about this work by using main editor. You have to set some settings by using metaboxes below main editor.
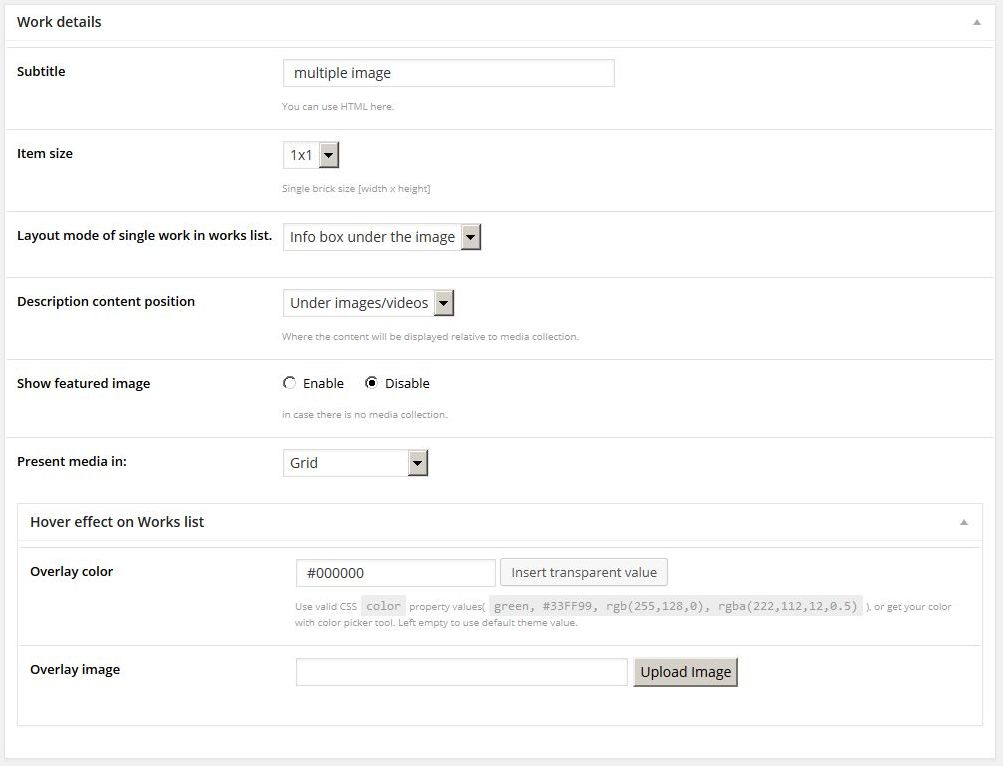
- Subtitle - just additional title, describing more what is it about.
- Item size - Item size.
- Layout mode of single work in works list. - [over image / under image ] - the position of text block. If over - you can chose the alignment [left/right/center]
- Description content position - [right/left/under] - the position of text block relative to the media block.
- Show featured image - display or not display featured image in there's no media collection (for single work view).
- Present media in - you have 3 options to choose for: Grid, Slider or Full width photos.
For Slider you have 4 more options:- Fit images - you can use auto(Fit always) or decide in which way images should be streched to fill screen. Fit when needed is best for small images, that shouldn't be streched to bigger sizes, only to smaller(to keep them visible).
- Transition type - 3 types: Carousel, Fade and no transition.
- Random slide order - self explanatory.
- Autoplay - automatically changes items.
- Last thing to do is set (optionally) Hover effect on Works list - you can set the hover color and/or image for each Work separately
Next it is time to add some photos & videos to present our work. Lets check screen below:

- If your browser supports multi upload then you can use it to upload many images at once.
- You can add title and description for each photo/video.
- Color under photo - useful only in Slider.
- You can also make photo to be custom link. If link option is filled, then this photo won't be visible in lightbox.
- If you choose video type, you have to add link to video(youtube link, vimeo link, or link to mp4, ogv)
- also you may add video,thumb it will be displayed instead of video placeholder in some cases. If you won't provide any then:
- Viemo and Native video will use placeholder
- Youtube will use defult youtube thumbnail
- You can also choose to autoplay video.
In case of Slider and Full width photos images are loaded in full size(same as uploaded). Important thing here is to keep images in rational dimensions cause uploading here 10MB file could kill user transfer when viewing single work. And what would happen if you would have 20 images with 10MB each... :-)
Here is cite from our user about uploading too big photos, it is from our forum:
That is a real shame. For any other photographers that might read this post, there are two very important reasons to keep the images a reasonable size:
1) Loading time. The last thing you want when an agent or client is viewing your portfolio is for them to have to wait more than a split second for an image to load. With a 3MB image and even a reasonable connection speed these people will quickly move on and find another photographer for the job (especially if you have a number of images in your portfolio).
2) Discourage theft of your images. An 800px image will print at 300dpi on a 4x6 but no larger. This makes it more difficult for anyone to use your images without permission or payment. If you provide a 3MB image, you are asking for your work to be stolen. This happens ALL THE TIME.
JackieR0
Adding Genres
You can display Works in multiple blocks if you wish. To do it, first you have to asign your works to different categories(genres). You can do it by choosing genres while adding work, like you can see on image below:

All your genres can be find in My Works menu under Genre

After you asigned different works to different genres you can use it in Works list shortcode. Take a look at our shortcodes.
People
People - this is a custom post type that is designed to present various informations that concern various groups of people.
With use of this custom post type and two shortcodes You will be able to display Team members, Clients and Testimonials.
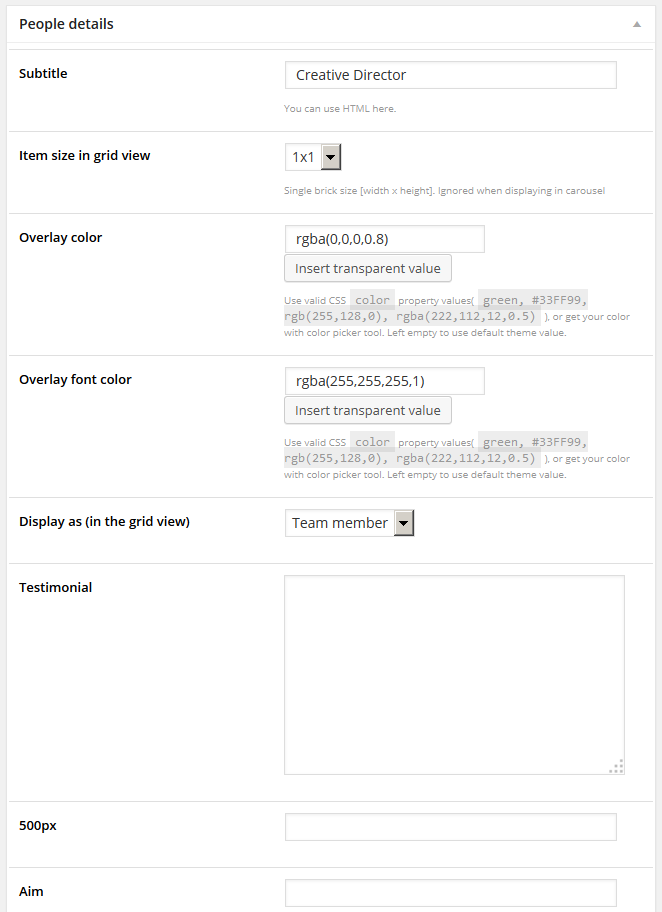
Explanation of metadata used to customize People post type.
- Subtitle - used only for Team member in Team shortcode and Testimonial mode in People shortcode
- Item size - used only with Team shortcode to define the size of single brick
- Overlay color and Overlay font color - used only in Team shortcode to define the overlaying alyer.
- Display as (in the grid view) - used only in Team shortcode to determine the role of item within a collection.
- Testimonial - used only in Testimonial mode of People shortcode.
- 500px, Aim, ... - set of social services, used only in Team shortcode.
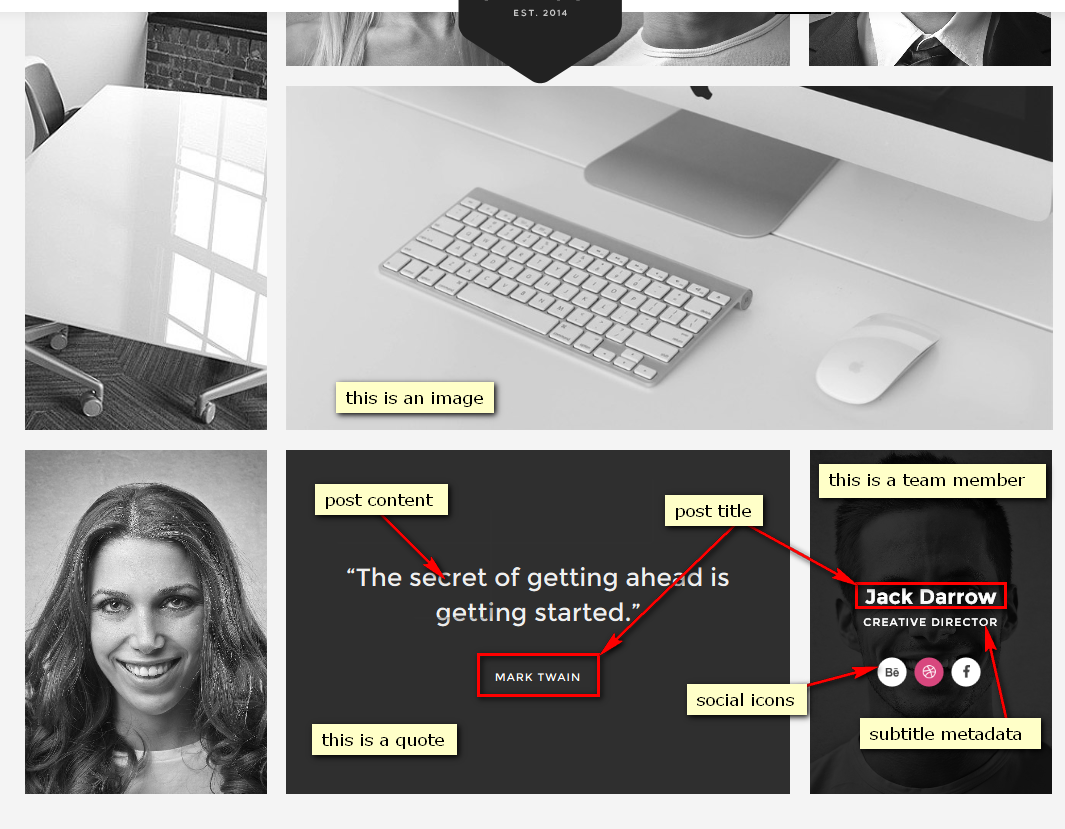
The content can be build with Visual Composer, but it make sense only for Team Members displayed by Team shortcode.
The content is the place where You can also put a quote. Don't forget to set the Display as parameter to Quote.
When You display a set of client (look at the demo page, section 'OUR WONDERFUL CLIENTS') the content is displayed on flipable box and is supposed to display a simple description of the client.
Of course You can use this mode (Simple Presentation mode of People shortcode) to do whatever You want.
One Page Design
Here we will explore the core of One Page idea and the way it is implemented by Chillout theme.
Building the page
One Page layout is expected to do the job with only one page. And this is what we are focused on. Demo page is a good example of this principle.
Visual Composer has been equiped by us with new features, that help you to define blocks within a page, give a name to each of those blocks, and finally use those blocks as Navigation Menu items. Let's go through the process.
Before you start designing Your OnePage - You must define a set of special data named Navigation Anchors that can be found on Left Menu in admin panel. Just give them name, nothing more. They will be used to mark every page section, that is designed to be accessible from navigation menu.
Now You can start crating OnePage dising.
- Create new page or edit one.
- Enable Visual Composer(1) and add two rows (2)
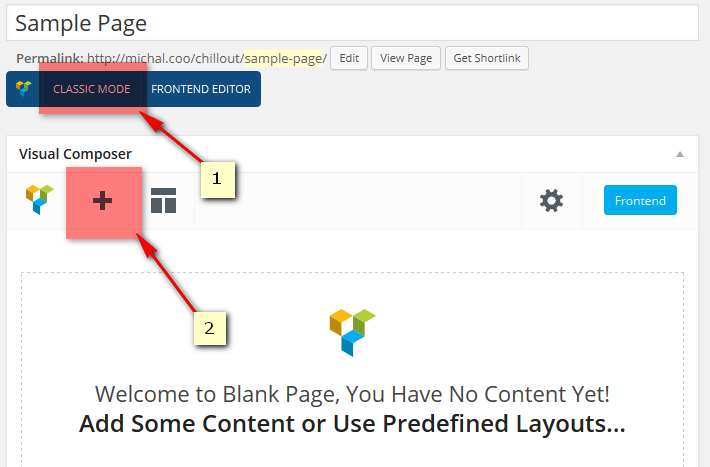
- Fill both of them with some content and edit second row
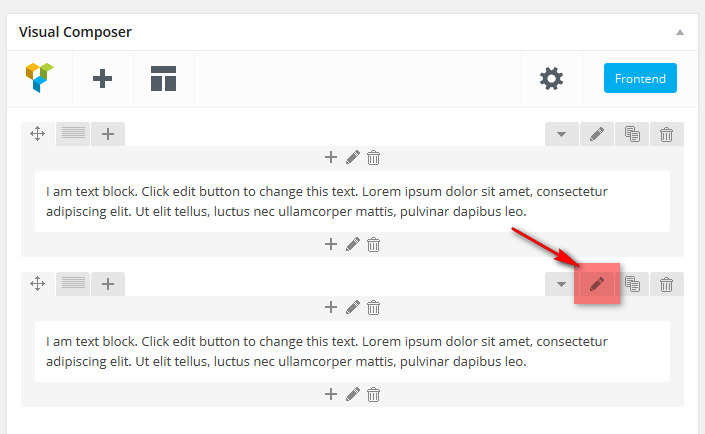
- Go to the very bottom of modal window that apeared, check (1), pick one of the previously created Navigation Anchors (2). Press 'Save'. Save and publish page.
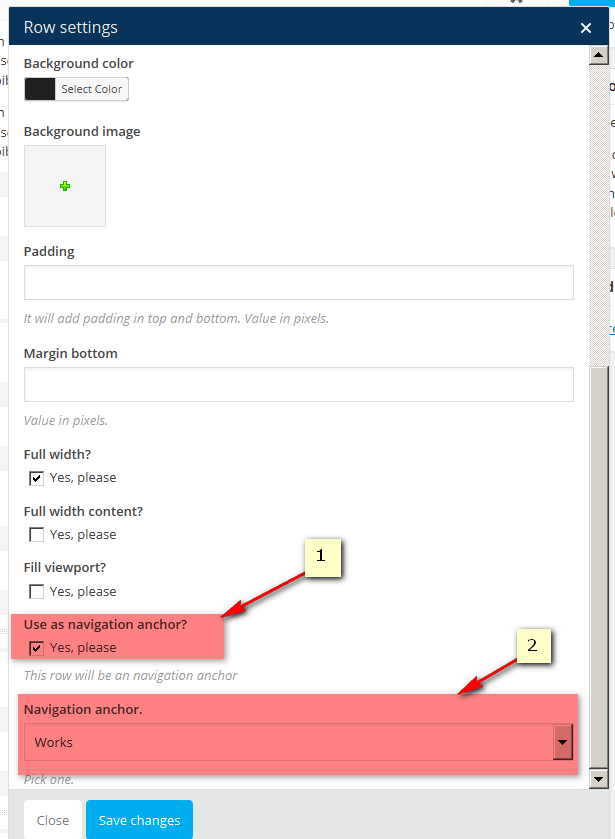
- Chillout is doing the magic now...
- Go to Appearance >> Menus, select menu, open Navigation Anchors (1), add Works (2) and (3).
Don't forget to save menu.
- Now check your website. Works should be in correct place of Navigation Menu. Click it!!! Nice scroll, huh?
Now you can design whole page and arrange navigation menu as you like. With JS Composer you can also desing your own footer (just don't forget to disable classic footer in Chillout options >> Layout >> Footer).
That is what we call One Page. We are Apollo13.
Our shortcodes
The list of our shortcodes or the modification we've made to shortcodes built in JS Visual Composer. But we'll cover things not trivial only
- Row
- Navigation anchor - HERE you can check all that concern this feature.
- Parallax effect - To enable this effect for single row choose a background image and check the 'Enable parallax?' option and finally set the parallax speed.
- Stealth mode - single checkbox, that allows you to stop displaying entire row on page without losing it from page design. Exceptionally useful for periodical content.
- Social icons bar - just place all social services you have pointed in Chillout options >> Social settings >> Social services
- Works list - provide blocks to display Works
- Counter - provide count-down blocks
- People - displays People post type. You can chose 'Simple presentation' mode (used for displaying clients) or 'Testimonial' mode.
- Team - displays People post type as a Team.
- Navigation menu anchor - very usefull shortcode. You can easily place the header containing navigation menu wherever you want. See the demo page, we wanted to place it below fullscreen slider - it was very easy, believe us. If you want to have something more above the header - just do it.
Translating theme
Theme is prepared for translation, so it will just require some time for you to see our theme in your language(if it isn't translated to it yet). Important files you will find in theme directory in chillout/languages/default.po
This file should be opened in program like Poedit and translated. After everything is done you have to save your translation with proper name. Names for each country can be found here (in parenthesis in titles). So for example for German - Deutsch you should save files as de_DE and get 2 files: de_DE.po and de_DE.mo.
Copy these files to chillout/languages
At end you have to go to your WordPress installation root directory and find file wp-config.php.
There you have to find line that looks like:
define('WPLANG', 'en_EN');
and make sure that code there is your language.
After that if everything went fine, you will see theme in your language:-)
In every update, file default.po may change as we may add some new functions or fix some spelling, but you can use your old translation to get most of work done.
Good article about translating theme can be found in http://www.solostream.com/blog/tutorials/translate-wordpress-theme/
Also good to read is http://codex.wordpress.org/Translating_WordPress
There is also file with translation in backend area in chillout/languages/admin/default.po. You can edit it by following same process.
Here we post image where to type translated texts in Poedit, as not everyone get it right away.

Modification of theme
Many of you may be tempted to edit theme files, but by doing so you block yourself from geting updates of theme, as you will loose your changes when you update theme. Fortunately there is solution - making child theme. Even WordPress team advice this as best solution:-)

Anyone intrested in this should read http://codex.wordpress.org/Child_Themes
But lets check how to do it with this theme.
In file downloaded form ThemeForest there is attached sampel child theme, so you can start changing theme even faster. To install it follow this steps:
- Install normal theme.
- Repeat step 1 but now install theme from chillout_child.zip
- Activate child theme.
- Done.
Now you can overwrite styles, theme functions and even whole templates. Lets check some examples.
Changing CSS
If you want to change color and font size of content area you just have to edit style.css in child theme and add:
#content {
    color: #000;
    font-size: 20px;
}
Now you have black big text :-)
Good tool to detect what should you change and where is Firebug for firefox. Here is tutorial how to use it http://www.youtube.com/watch?v=oe1nqI4fNRc. Any browser has similar tool(under F12 key you can call it).
Custom CSS
For changes in css you can also special area in theme BP Apollo13 theme->Appearance->Custom CSS. There you can insert your custom css.
In this theme default stylesheet is loaded from main theme, and then you can overwrite CSS rules in style.css in child theme. After this come user.css with changes set in admin panel. So finally it loads in this order:
1. main theme style.css or compressed.css
2. child theme style.css
3. user.css(settings form admin panel)
4. Custom css(it is added at end of user.css)
Changing theme functions
This is not real example, and it wont work with this them. It is only here to demonstrate the idea.
Another example, you may wish to change info that is displayed under title of each post(date, author, categories, tags) so you have to define your own version of a13_post_info() function. Lets say you wish to remove tags from that list. Just open functions.php in child theme and drop this code:
function a13_post_info() {
    ?>
<div class="post-info">
    <span class="categories"><?php _fe('Category' ); ?>: <?php a13_posted_in( ', ' ); ?></span>
    <?php echo ' <span class="comments"><a href="' . get_comments_link() . '" title="' . sprintf(__fe( '%d Comment(s)' ), get_comments_number()) . '">' . sprintf(__fe( '%d Comment(s)' ), get_comments_number()) . '</a></span>'; ?>
    <?php edit_post_link( __fe( 'Edit' ) ); ?>
</div>
<?php
}
You have now overwritten main theme function, and your version will be loaded.
Most interesting functions you will find in inc/utilities.php(in main theme) , but there is more functions that you can change in child theme. All functions that can be overwritten has before its definition code: if(!function_exists('function_name')). If you wish to change other functions ask on our forum for support in that case or just don't bother with child theme and change main theme(if you understand imlications;-) ).