CeeVee | Responsive Vcard WordPress Theme
Documentation
- created: 10/04/2015
- latest update: 10/04/2015
- by: Apollo13
- email: info@apollo13.eu
Thank you for purchasing our theme. In case of any questions or doubts, do not hesitate to contact us via our Support Forum: http://support.apollo13.eu/. We will do our best to solve any problem concerning the project.
At the same time we invite you to visit often our profile on ThemeForest since there will be appearing the improvements of our project and the newest theme updates.
Installation & Update
Install
Before you install or update theme it would be good that get familiar with Wordpress info about it. To install theme you can:
-
Upload it via FTP(safer)
- Download ZIP file from ThemeForest and find in it ceevee.zip(theme file)
- Unpack files from ceevee.zip. You should now have directory ceevee and in it other directories and files like 404.php, home.php, index.php etc.
- upload entire ceevee folder to /wp-content/themes/ in your WordPress installation
- login to admin panel in WordPress, and go to Appearance->Themes and click Activate below CeeVee theme
-
Upload it via admin panel(can get error while upload on slower connections, or cause of other issues)
- Download ZIP file from ThemeForest and find in it ceevee.zip(theme file)
- go to Appearance->Themes->Install Themes(Tab)->Upload and choose file ceevee.zip
- go to Appearance->Themes and click "Activate" below CeeVee theme
After that you will see new menu named CeeVee options and that is where all fun begins :-) Also you will see Works, Navigation Anchors and People menus. We will talk about them later.
Before you proceed any further you will have to install required plugins, which are crucial for our theme to work. You'll be informed about them in screen notification. Just click Begin installing plugins link and install all required plugins. After installation don't forget to make sure all required plugins are active.
If some of embeded plugins fails on install you can go to ceevee/inc/plugins and install every plugin(zip file) from there manually, by wordpress panel http://codex.wordpress.org/Managing_Plugins#Installing_Plugins
Update theme
To update theme you can either follow below description or try to use plugin from Envato named Envato WordPress Toolkit. Here is description how to use it http://premium.wpmudev.org/blog/how-to-update-themeforest-themes-with-the-envato-wordpress-toolkit/.
As this theme is commercial one, for now we don't provide auto update option for theme, as this will lead to easily stealing our work. In future this may change, but for now updates are only available on ThemeForest in place where you have downloaded your first version of theme:-) Although WordPress will inform you about new version of theme, but you still will have to go to ThemeForest site.
When you got zip file with theme, best way to update theme is to use plugin such as http://wordpress.org/extend/plugins/easy-theme-and-plugin-upgrades/.
If you have problems with updating theme from Wordpress admin panel, then delete theme (from panel or manually via FTP) and upload new version. It is same process as installing via FTP. You wont loose your theme settings.
If you have made some changes in theme files you will have to manually update to keep your changes.
Remember to always backup your data before update!(or cry if you didn't and something went totally wrong)
Use of Easy Theme and Plugin Upgrades
Upgrading a Theme
- Download the latest zip file for your theme.
- Log into your WordPress site.
- Go to Appearance > Themes.
- Click the "Add new" button.
- Click the "Upload Theme" button.
- Select the zip file with the new theme version to install.
- Select "Yes" from the "Upgrade existing theme?" option.
- Click "Install Now".
Quite often new version of our theme will come with upgaded plugins. You'll be informed by screen notification. Just click Begin updating plugi link and click Update link under every plugin that needs to be updated.
If you dismissed previously notice about plugins, you will also wont see it after theme update. To see it again you will have to deactivate and activate again theme. You can also check if there is menu Appearance->Install Plugins. If this menu option is available then go inside and check what need to be updated.
After installation
Set permalinks
It is good practice to set permalinks for your site. Go to Settings->Permalinks and set anything other then default seetings.
Add menu
Next you should choose menu to use in theme. To do it follow this.
Next you should scan through Theme options to set everything you need.
Installing Demo data
Theme demo data
If you really need to see your new site as our demo page, then this is section for you. This is why we provide sample data, if you like to see how it is all made from backend in admin page. If you are confused about options in theme, we advise to use it only to see how things are made. After that, you should clean your WordPress so you don't have any unwanted content ;-)
- Locate the sample data file, named ceevee.wordpress.xml (or similar) in Dummy Data folder in file downloaded from ThemeForest.
- Open Tools->Import menu and choose WordPress option(Installation may be needed first).
- Upload sample data file.
- On the next page you should check Download and import file attachments
- Go to VeeVee Options >> Import/Export and import Theme Settings (light or dark version) by uploading Light_Version_Settings.json or Dark_Version_Settings.json file from Dummy data folder
But it would be simple if this will end here :-) Import will probably fail(cause of timeout while downloading images), so you will have to repeat above steps few times, till you get success message. After this fallow next steps:
- Go to Settings->Reading->Front page displays and do this
- Go to Appearance->Menus and select one menu Theme locations to be Site Navigation. See adding menu.
- You may need to clean menu listed on the right couse it may have 'doubles' due to many import attempts.
- Widgets will be totally no good, so go to Appearance->Widgets and make some cleaning and inserting into sidebars.
- Theme should look good enough now.
Cause of server load and servers(yours and our) connection speed there can be issues while making full demo data import. When you select to download attachments there is possibility it won't make it in 30 seconds(default maximum execution time of PHP script). That is why you sometimes have to try many times before all data is downloaded to your server.
As there is some megabytes to download, multiple attempts with fails may produce some errors in imported data. This may cause site to not working at all or giving strange results.
To avoid it, but still get view on how sites are created, don't check Download and import file attachments while importing.
Adding Frontpage
To make frontpage and Blog work as it should you have to follow this steps:
- Go to your WordPress Pages->Add new
- Add new page named Home Page and another named Blog. These names are examples, you can change them.
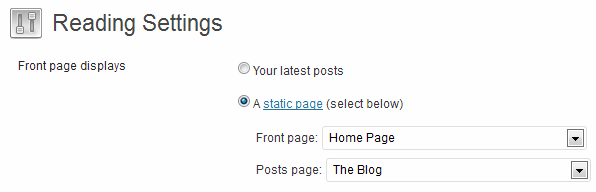
- Go to Settings->Reading->Front page displays
- Choose "A static page (select below)"
- In Front page: choose Home Page
- In Posts page: choose Blog
- Save changes.
- You are done :-)
Adding New Posts
If you are not familiar with adding posts in WordPress please read http://codex.wordpress.org/Writing_Posts
Posts excerpts
If in CeeVee options->Blog->Type of post excerpts is set to Auto, then If while writing posts you won't use more tag then theme will use excerpt feature. Excerpt are made automatically, but you can also specify what will be displayed. Just find Excerpt box, and type text you wish Read more.
Adding New Pages
If you are not familiar with adding pages in WordPress please read http://codex.wordpress.org/Pages
To get all the juice from CeeVee You need to use Page Builder. In THIS chapter we'll show You how to design pages in CeeVee theme.
Extra options for pages are:
- Maximal number of tiles per slide when collapsed - Maximum number of content's tiles visible at once in Page Slider.
- Minimal tile width when collapsed - The tile of content block will never go under this value when Page Slider is collapsed
- Initial page slides state - Whether Page Slider is opened or collapsed on page load.
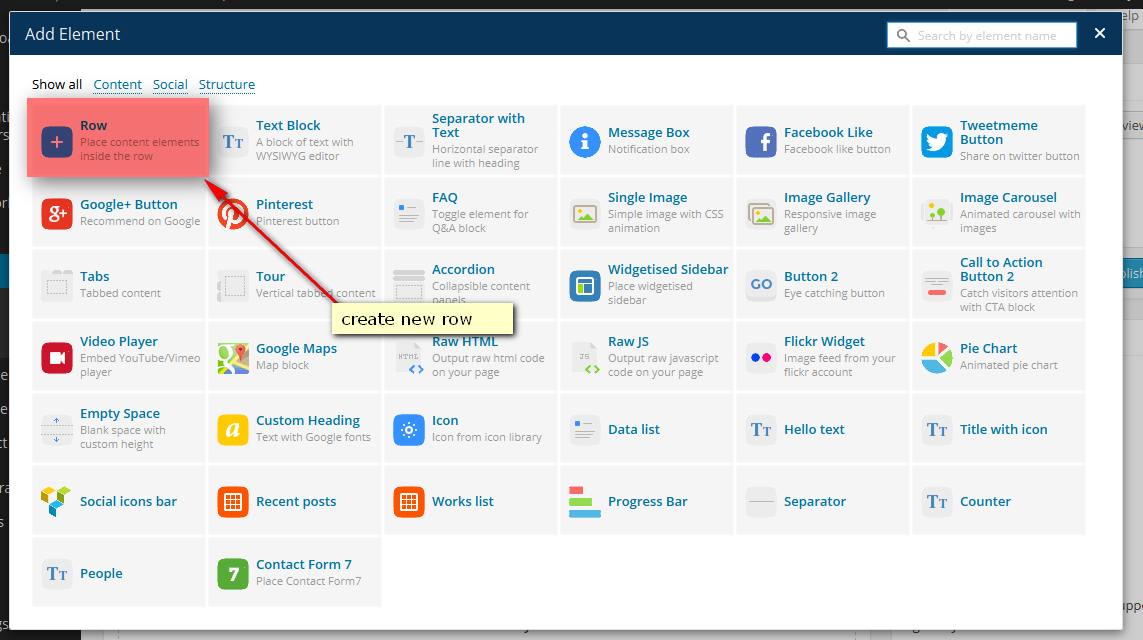
Adding Works
Adding new work is pretty easy. First you should set title and Featured image.
Next you can fill description about this work by using main editor. You have to set some settings also, lets check what we have there:
- Subtitle - The subtitle. No need to explain.
- Description content position - Position on content relative to Feature Image.
- Overlay background color - Color of overlay layer - visible on hover.
- Overlay font color - Font color of overlay layer - visible on hover.
Adding People
People - this is special type of posts meant to display Testimonials and My Clients sections.
Adding people is pretty easy. First you should set title and Featured image.
Next you can fill description by using main editor. This description will be displayd as Client's description or as Testimonial - it's up to which shortcode will be used.
You have to set some settings also, lets check what we have there:
- Subtitle - The subtitle. No need to explain.
- Overlay background color - Color of overlay layer - visible on hover.
- Overlay font color - Font color of overlay layer - visible on hover.
Designing the page
CeeVee theme is meant to organize your website in slider-like style. It's all managed by several additional options within Row shortcode.
CeeVee can display pages created without use of Visual Composer.
Now we'll go through the process of designing the page.
New Page
Go to admin panel and go to Pages->Add New
Make sure that You're in Backend editor mode. You should see something like this:
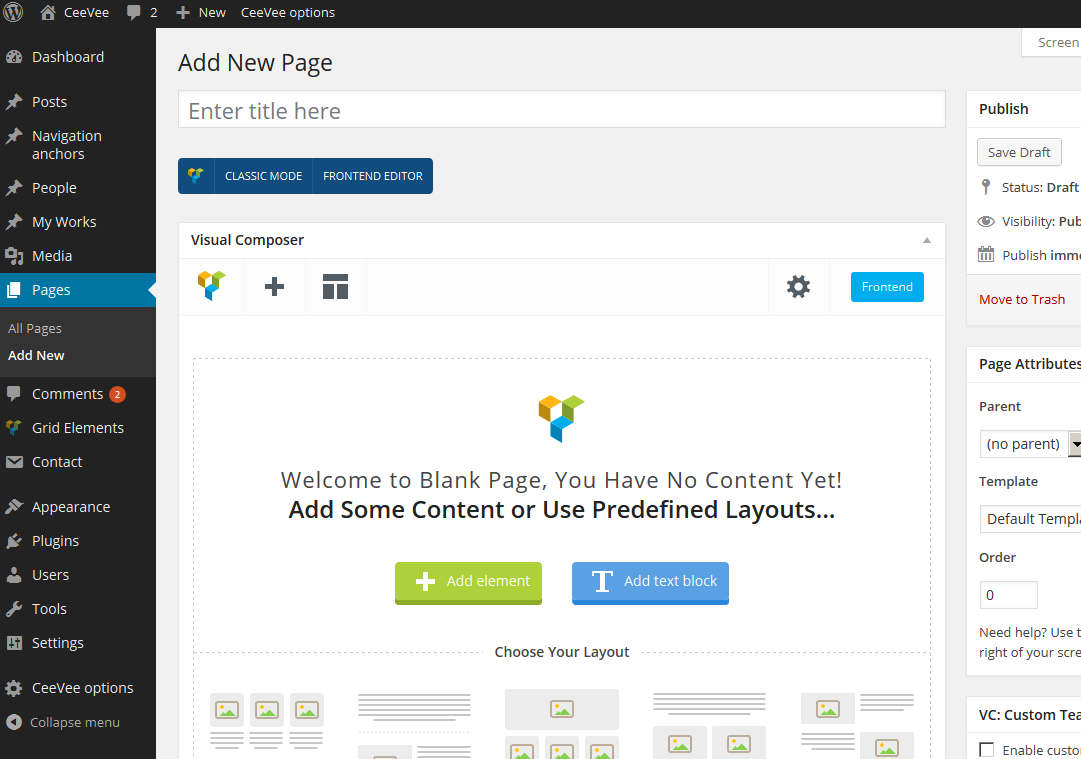
Now enter the title and save the page.
Prepare the Page
Now create three separate rows (not one inside the other).
You should see something like this:
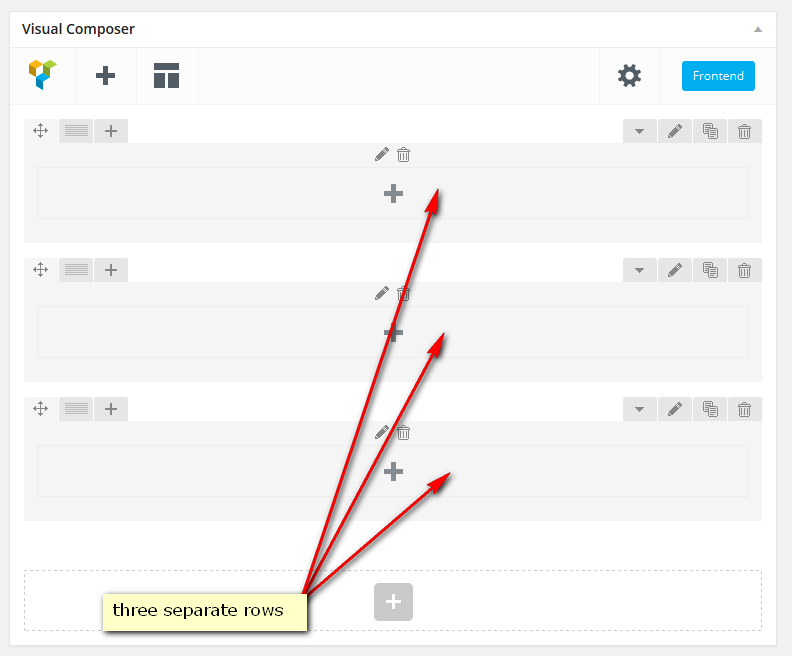
Each row will be displayed as separate item of Page Slider.
See the demo page - About Me, Resume, Portfolio - all this slides are in fact top level rows. If You import the demo data You can examine the desing of home page.
Please note that only top level rows are displayed as Slides. You can use interior rows to organize content of each page slider item.
Configure the Page
Now we'll go through all row's settings. To access Row's setting panel press pencil icon (top-right corner)

This is how the row's setting panel looks:
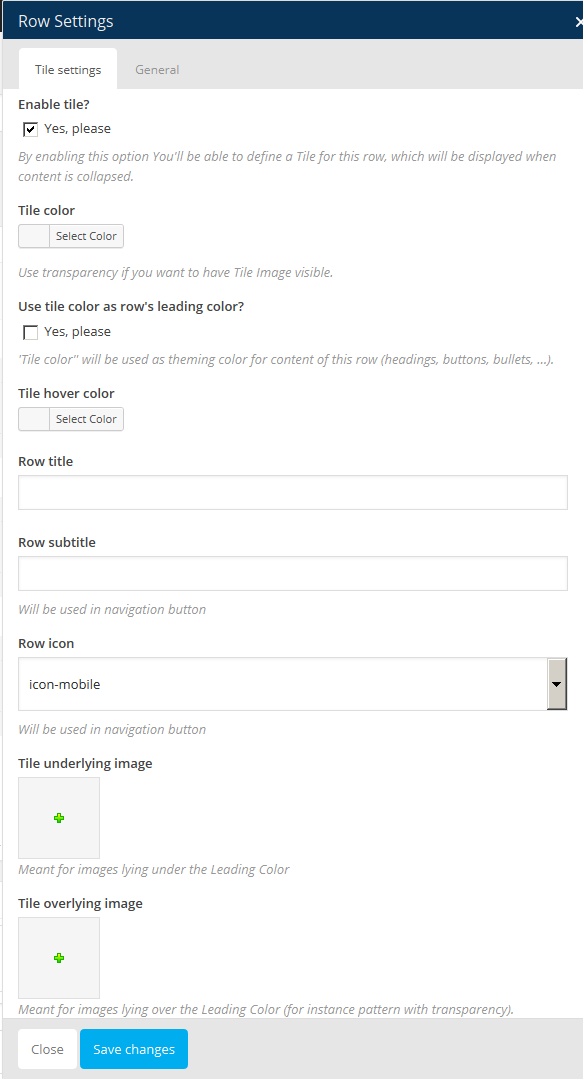
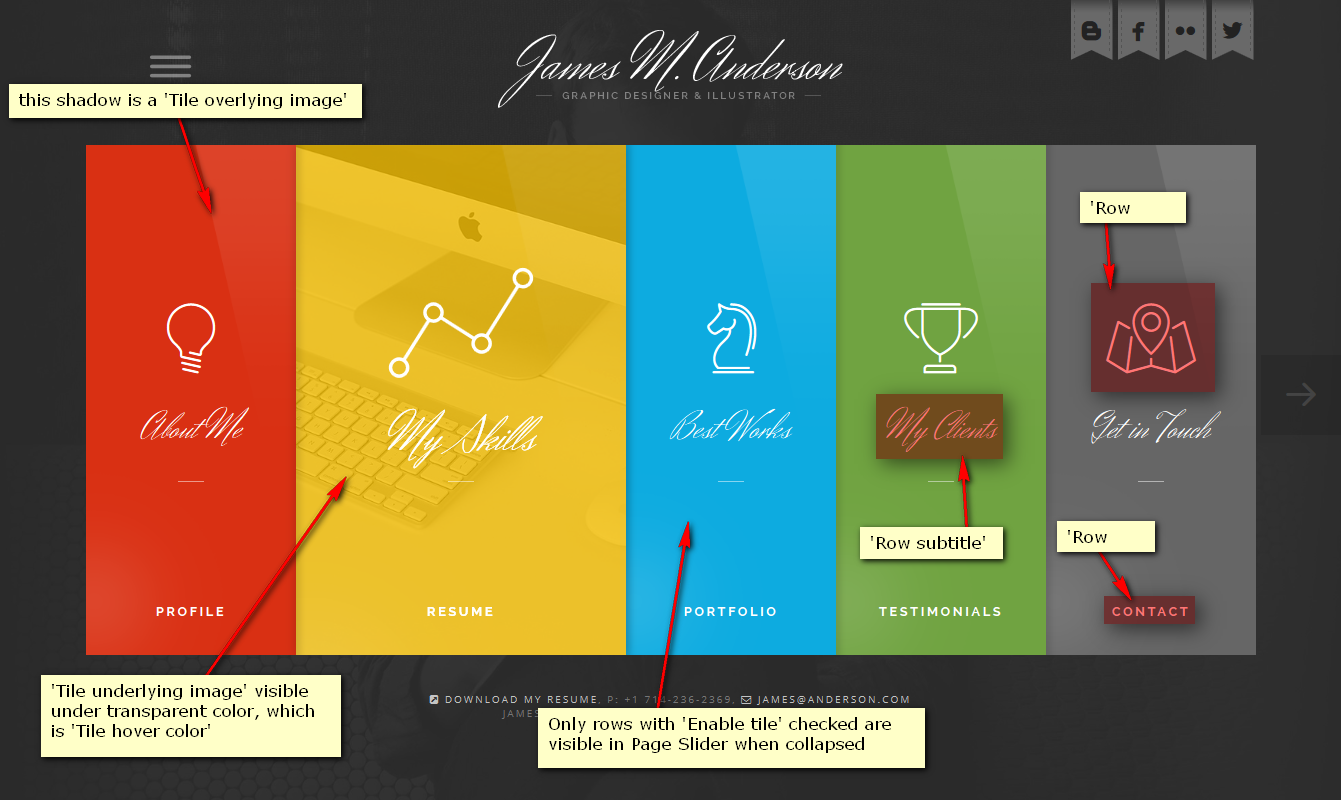
Now let's talk about all the options - best way is to show how it works. See the image and explanation below.
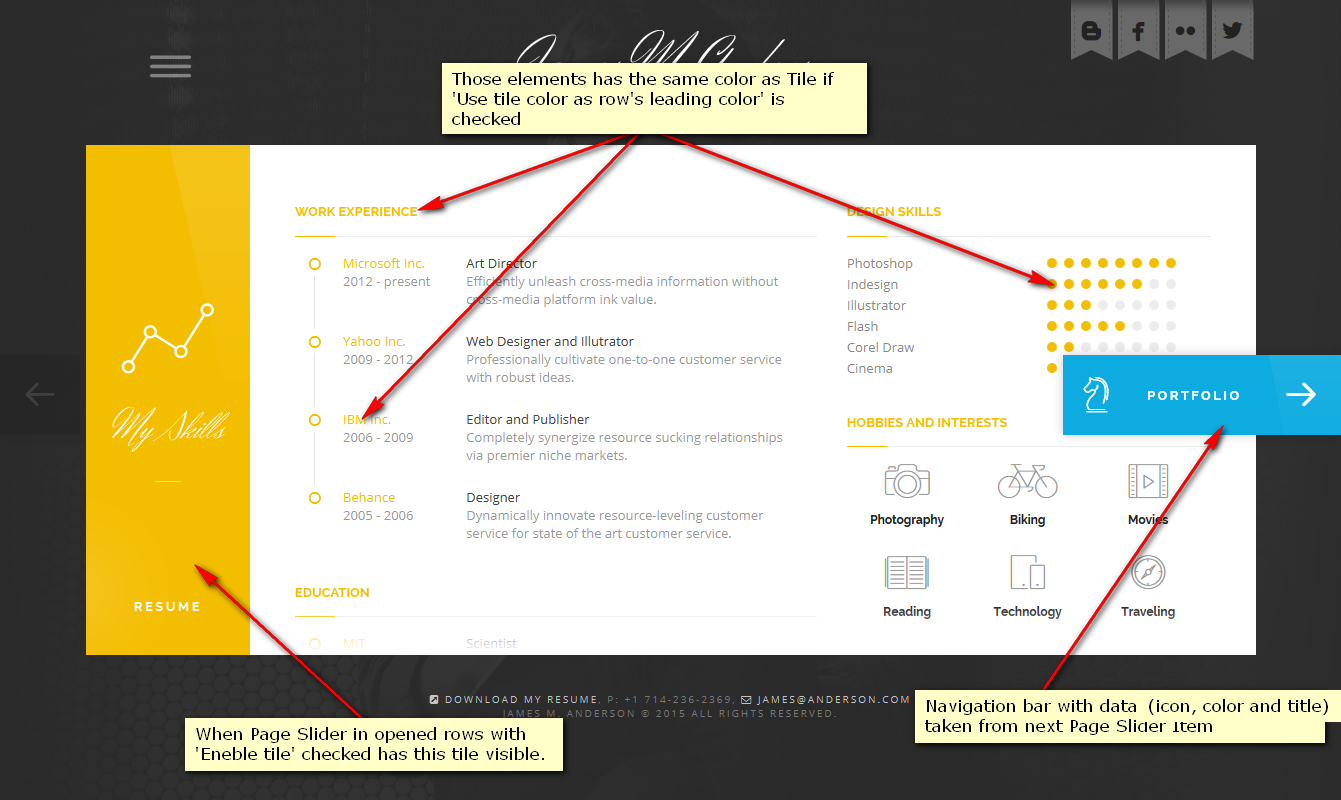
- Enable tile? - If tile is enabled the Page Slider item will get tile on the left side, and also th Page Slider item will be visible when Page Slider is in collapse state.
- Tile color and Tile hover color - trivial; those are colors used to pain Page Slider item's tile, and navigation bars
- Use tile color as row's leading color - if checked the 'Tile color' parameter is used to paint elements within this row
- Row title see image above
- Row subtitle see image above
- Row icon see image above
- Tile underlying image some theming photo
- Tile overlying image transparency patterns
You'll make rows invisible when Page Slider is collapsed by setting 'Enable tile' unchecked. But still those rows will be visible when You open Page Slider and navigate to rows without tile.
Navigate the Page
If You want to make certain Page Slider Item accessible from Navigation Menu then please go to General tab of 'Row setting' panel and enable Navigation Anchor.

Filling the Page with content
Now You're free to use all the desinging power of Visual Composer and some additional shortcode that we prepared for You.
Translating theme
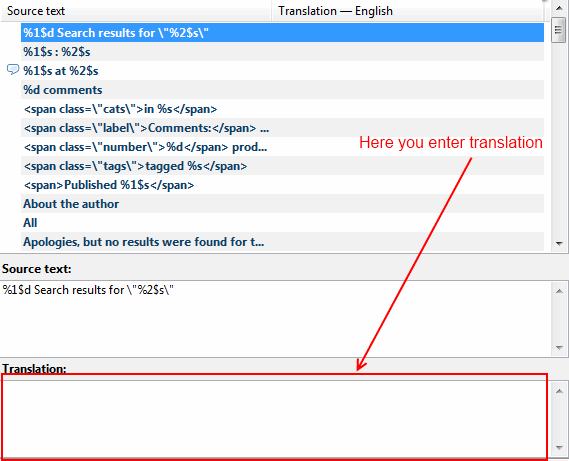
Theme is prepared for translation, so it will just require some time for you to see our theme in your language(if it isn't translated to it yet). If you are not using any plugin for translations like WPML, then keep on reading. Important files you will find in theme directory in ceevee/languages/default.po
This file should be opened in program like Poedit and translated. After everything is done you have to save your translation with proper name. Names for each country can be found here (in parenthesis in titles). So for example for German - Deutsch you should save files as de_DE and get 2 files: de_DE.po and de_DE.mo.
Copy these files to ceevee/languages
At end you have to go to your WordPress Settings->General and set language.
After that if everything went fine, you will see theme in your language:-)
In every update, file default.po may change as we may add some new functions or fix some spelling, but you can use your old translation to get most of work done.
Good article about translating theme can be found in http://www.solostream.com/blog/tutorials/translate-wordpress-theme/
Also good to read is http://codex.wordpress.org/Translating_WordPress
There is also file with translation in backend area in ceevee/languages/admin/default.po. You can edit it by following same process.
Here we post image where to type translated texts in Poedit, as not everyone get it right away.
Modification of theme
Many of you may be tempted to edit theme files, but by doing so you block yourself from geting updates of theme, as you will loose your changes when you update theme. Fortunately there is solution - making child theme. Even WordPress team advice this as best solution:-)

Anyone intrested in this should read http://codex.wordpress.org/Child_Themes
But lets check how to do it with this theme.
In file downloaded form ThemeForest there is attached sampel child theme, so you can start changing theme even faster. To install it follow this steps:
- Install normal theme.
- Repeat step 1 but now install theme from Child Theme\ceevee_child.zip located in file downloaded from ThemeForest.
- Activate child theme.
- Done.
Now you can overwrite styles, theme functions and even whole templates. Lets check some examples.
Changing CSS
If you want to change color and font size of content area you just have to edit style.css in child theme and add:
#content {
    color: #000;
    font-size: 20px;
}
Now you have black big text :-)
Good tool to detect what should you change and where is Firebug for firefox. Here is tutorial how to use it
http://www.youtube.com/watch?v=oe1nqI4fNRc. Any browser has similar tool(under F12 key you can call it).
Custom CSS
For changes in css you can also use special area in theme CeeVee options->Custom Style. There you can insert your custom css.
In this theme default stylesheet is loaded from main theme, and then you can overwrite CSS rules in style.css in child theme. After this comes user.css with changes set in admin panel. So finally it loads in this order:
1. main theme style.css
2. child theme style.css
3. user.css(settings form admin panel)
4. Custom css from panel(it is added at end of user.css)
Changing theme functions
This is not real example, and it wont work with this theme. It is only here to demonstrate the idea.
Another example, you may wish to change info that is displayed under title of each post(date, author, categories, tags) so you have to define your own version of a13_post_info() function. Lets say you wish to remove tags from that list. Just open functions.php in child theme and drop this code:
function a13_post_info() {
    ?>
<div class="post-info">
    <span class="categories"><?php _fe('Category' ); ?>: <?php a13_posted_in( ', ' ); ?></span>
    <?php echo ' <span class="comments"><a href="' . get_comments_link() . '" title="' . sprintf(__fe( '%d Comment(s)' ), get_comments_number()) . '">' . sprintf(__fe( '%d Comment(s)' ), get_comments_number()) . '</a></span>'; ?>
    <?php edit_post_link( __fe( 'Edit' ) ); ?>
</div>
<?php
}
You have now overwritten main theme function, and your version will be loaded.
Most interesting functions you will find in advance/utilities.php(in main theme) , but there is more functions that you can change in child theme. All functions that can be overwritten has before its definition code:
if(!function_exists('function_name'))
. If you wish to change other functions ask on our forum for support in that case or just don't bother with child theme and change main theme(if you understand implications;-) ).
Support Forum
In case of any questions or doubts, do not hesitate to contact us via our Support Forum http://support.apollo13.eu/
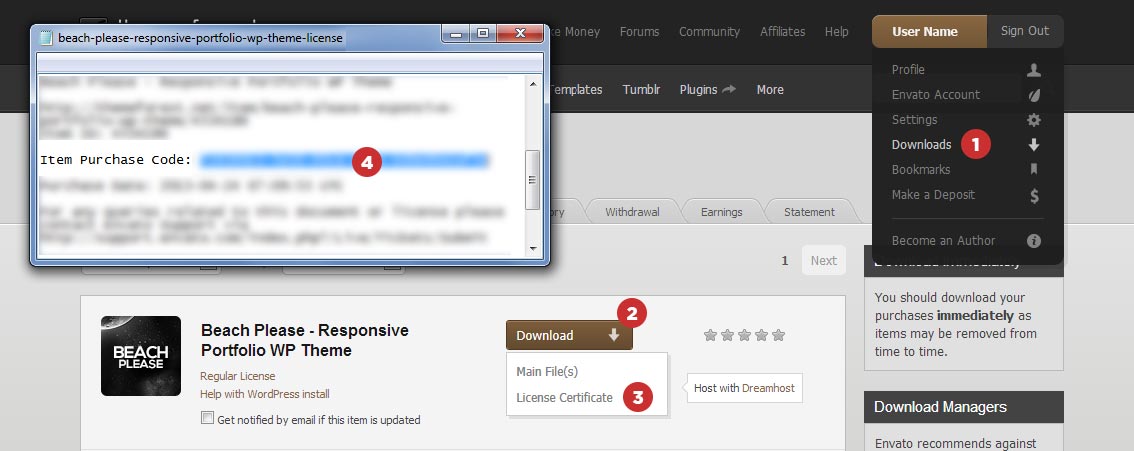
Instruction how to get Purchase Code: